Be ready with your machine model number and serial number to verify eligibility.
Did you purchase your machine from another dealer?
For support, please contact the support number of the dealer you purchased your machine from.
Applicable fees may be required for non-TexMac customers requesting support.
Common Error Codes for Happy 1-Head Touchscreen Machines
If the machine stops due to faults or errors, an error code will often show on the screen. Below are some of the most common error codes that will appear on your touchscreen. If these occur, you have two options:
AUTO
Press this button to allow the machine to try to resolve the problem automatically.
MANUAL
Choose this option to try and manually resolve the problem.
E-050 C-Point
The machine has failed to return the main shaft position to its at-rest position (270 or 275 degrees) after it last stopped. If AUTO does not clear this error, follow these steps:
Go to the back of the machine.
Remove the round black rubber cap.
Insert a 3mm Allen wrench into the socket of the main shaft dial.
Try manually turning the dial clockwise until the C point is at the pointer (usually 270 or 275 degrees, depending on the machine model).
While doing this, turn the shaft all the way around to make sure it can do so without any resistance.
E-018 Main Shaft
The machine has failed to return the main shaft position to its at-rest position (270 or 275 degrees) after it last stopped.
E-021, 022, 024
Needle move, needle center: The head failed to move enough left-right to the current needle position completely. It may be off even slightly.
E-020, 026
Needle detection, needle difference: The machine is unsure or incorrect about which needle number sits over the needle plate.
E-051, 052
C and L sensors may be dirty or out of alignment with the shaft.
E-060 X-Limit, E-061 Y-Limit
Part of the design will sew outside of allowable limits. Adjust design position or reduce size.
E-114 Id Over
The memory is full. Delete some designs.
E-190 Cut blade
The moving knife failed to swing completely shut after a cut cycle.
E-193 Catcher
This is caused by the catcher (upper thread hook) failing to retract upwards fully.
This can be due to a catcher problem or the thread still not being cut after a cut cycle.
The catcher tried to grab the uncut thread, which was strong enough to prevent the catcher from retracting.
In the latter case, the machine had a problem cutting, which in turn caused the catcher error.
E-155 Takeup Cover
Applies to HCS1 and HCS2 12-needle Voyager models only. Close the clear take-up lever door.
Common Troubleshooting for Beginners
Here are resources for troubleshooting the HCH-701 7-needle Journey and HCD-1501 15-needle Touchscreen Machine, which includes models HCD2-1501 and HCD3e-1501.
Thread breaks
Here are some guidelines to help you troubleshoot and eliminate the causes of thread breaks.
Thread breaks
Check for an empty bobbin.
Check to see if the thread break sensor is properly threaded. It must turn easily as the thread passes through it.
Test pull the thread.
Broken thread
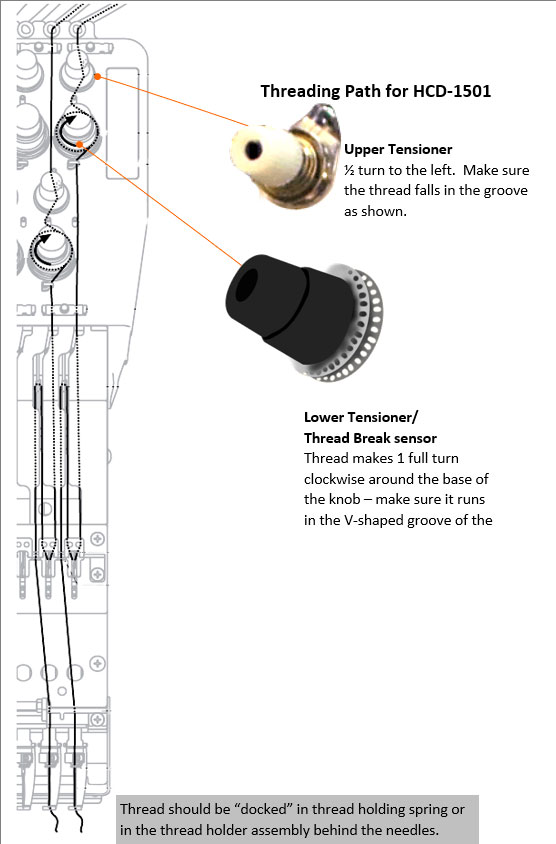
Check if the thread is properly routed at all points. Refer to THIS THREADING DIAGRAM for your machine.
Check that the needle is oriented correctly with the scarf facing backward and the groove facing forwards turned straight-on or so that the eye is slightly right of center.
Thread quality: Use high-quality thread (suggested brands like Rapos and Madeira which can be purchased from TEXMAC DIRECT. Quality thread has a long shelf-life (with proper care) and higher tensile strength to withstand tension tolerances on commercial embroidery machines.
Thread condition: Thread should be handled and stored carefully. For best performance, the thread on the cones should be touched by hand as little as possible and stored in a way that the machine wind isn’t physically touched/damaged. Thread should not be subjected to extremes of humidity and not be stored in direct sunlight.
Here’s a good troubleshooting technique for thread: move the thread cone to another needle position and/or swap for a new cone of thread. If all the above basics are followed, and thread breaks continue wherever the cone is placed, that particular thread cone can be considered suspect.
Birdnesting
This term describes a buildup of thread on top of or under the garment, often underneath the needle plate. This generally causes the machine to stop and indicate a thread break, sometimes an E-018 main shaft error.
Causes of birdnesting:
The bobbin case is not threaded correctly, or the bobbin case is not inserted or completely inserted in the machine.
A gross imbalance of tension makes the bobbin either far too tight compared to upper tension or, more likely; upper tension is far too loose.
The hoop is not moving the garment far enough to the next location of the next stitches. This can be caused by:
Item hooped too loosely
The garment falls out of the hoop, causing it to remain motionless as the machine adds stitches in the same spot.
There are too many stitches stacked in 1 spot in the design. This is rare, especially if a skilled digitizer creates the design.
Sewing Quality Issues
There are many possible causes for sewing quality issues, most of which can be addressed with the proper procedure. These include proper threading, tension, needle and stabilizer choice, proper hooping technique to secure the garment, digitizing quality, and matching the digitizing technique to the type of fabric or item being embroidered.
Looping or loose stitches
This can be caused by improper tension (usually not enough).
The machine may also be out of adjustment if it has not been maintained over a long period of time or has been subject to an incident (hoop strike / birdnest event, etc.).
Rough edges or design details not “crisp”
Check to see if the hoop arms are securely screwed/fastened to the machine or if the hoop is securely locked onto the hoop arms.
See if the item is hooped securely with no slack.
Poor-quality digitizing could be the culprit.
Improper stabilizer: rough edges and uneven sewing may result from the item’s underlying texture, such as a pile on a terrycloth towel or the “grain” of a pique knit. Water-soluble topping must be combined with proper underlay for crisp detail on textured fabrics.
Distortion of design or detail in the design
There’s overstretched fabric in the hoop. The fabric must be hooped taut without any slack but not stretched in the hoop.
Improper stabilizer or digitizing technique: stretchy fabrics such as knits must have adequate stabilizer matched with proper digitizing technique. This stabilizes fabric enough to allow detail to sew crisply without distortion.
How to Embroider on Ballcaps
Most issues relating to embroidering on ballcaps are eliminated with proper setup and the correct techniques for embroidering on ballcaps. Here are some procedures you can follow to ensure a successful outcome.
Proper cap driver installation
Follow the correct procedure for installing the cap driver for your machine. Click the appropriate link for the instructional video that applies to your model machine.
Watch the video to view the cap driver installation procedure for models:
HCH-701 Journey
HCH-701P
HCS-1201 Voyager
HCS2-1201 Voyager
HCS3-1201 Voyager
Watch the video to view the cap driver installation procedure for models:
HCD2-1501
HCD3e-1501
HCD3-1501
Proper hooping
Proper hooping technique is 80% of the success when embroidering on caps. Follow the procedure shown in this video on how to hoop ballcaps using the wide-field cap hoop.
Tips and Techniques for Embroidering on Ballcaps
The following list covers techniques unique to ballcap sewing (applicable to all model HappyJapan embroidery machines) that will help you reliably achieve quality embroidery on ballcaps—even on challenging types of caps.
Use tearaway backing only.
Do not use cutaway.
For some types of caps (such as nonconstructed caps), use 2 layers of tearaway.
Be sure the design is digitized for caps.
This is especially important with detailed designs where design elements must line up precisely with each other.
Generally, designs for ballcaps should be digitized to sew center-out.
The ballcap itself determines the usable sewing area, especially the height, in how tall a design can be.
Taller, trucker-style caps, for example, can accommodate designs as tall as 2.5” or taller.
Be sure everything is tight regarding the cap driver installation procedures and cap hooping procedure in the referenced videos:
Mounting screws for the cap driver must be tightened enough not to come loose during high-speed sewing/vibration. Generally, tighten these screws a little more tightly than you can with your fingers.
The cap should be hooped under tension, as shown in the video. The cap should be pulled downwards against the metal barrel form of the cap stretcher, as shown while the strap is applied. A loosely hooped cap will be subject to more flagging, which can cause a decrease in sewing quality or possibly needle breakage.
Ensure that all 3 of the cap driver’s spring-loaded clamps are fully locked onto the corresponding holes in the cap hoop. Take a few moments to lift each clamp lever to ensure the locking peg is recessed fully into the hole. This is extremely important for design quality and clean registration.
Support for Legacy Happy Single-Head Embroidery Machines
If you need support for a legacy machine, find your model below and click the button for service information.


